1 - An Unassuming Job Notice
All adventures start somewhere! We will need a way to start our quest off.
One of the more powerful features of Finmer's editor is that you can make modules that patch things in other modules. Conveniently, the main game content of Finmer - the 'Core' content, as it's called - provides lots of places like towns for us to work with. To start, we will add a new notice for our quest on the town notice board.
Don't forget you can always check our implementation of this tutorial quest to double-check something - it's included in source repository here. If you download the repository, you can open this example project in the Editor.
Of course, if something is unclear, I'd love to hear from you - suggestions for improvements are more than welcome!
Creating a new project
Open the Editor - you'll be presented with an empty project.
First off, you'll want to put the project somewhere on your computer. Click the 💾 Save As button on the Toolbar. Make a new folder for your project, and then save the project file in there - you can name it whatever you like.
It's important to put your project in a folder somewhere, because the Editor will create many files alongside it. Each asset in your module is saved as another file, so you could potentially have several tens or even hundreds of files alongside the project file. Obviously you'd want to keep that a bit organized.
If you save two projects in the same folder, the Editor cannot tell which files belong to which project. This will lead to one of the two projects being corrupted or deleted. The Editor will try to warn you if this happens.
Linking with the base game
We'll need to link the Core module. Finmer doesn't yet know that we intend to add stuff on top of the base game, so we need to tell it that.

Click the 🏷️ Module Settings button on the Toolbar. Here, we need to add Core as a dependency so that we can build upon the content provided by the base game. Under the Dependencies menu, click on the Add button and locate Core.furball on your computer. It's in the Modules folder of your game download. Add it, save your module and then reload the editor (such as by reopening your project).
Adding a module as a dependency means telling Finmer that your module requires these others also. All content of your dependencies - like scenes and items - will then become available anywhere you can choose such assets in your module.

Dependencies let you easily import content from other modules. You don't need to add dependencies if you don't intend to use them. If you want, you can make a 'total conversion' mod that doesn't make use of any Core content.
Creating a scene patch
Now we're ready to start building. Create a new scene by clicking Add Asset on the Toolbar, then click Scene.
The new scene will have a name like "NewScene1" in the asset list on the left. Click the scene in the list, and press the Rename button on the Toolbar (it's under the 'Assets' group). You can also click twice on the asset to rename it.
You are free to name it whatever you like. For this tutorial, we'll follow the practice of grouping things together. In Core, things related to quests are usually prefixed with the quest number, to clearly group them. Since this is our first tutorial quest, we will use the prefix TQ01 - short for 'Tutorial Quest 1'. This scene will be used to patch a new notice into the town's notice board, so let's call the scene TQ01_Patch_NoticeBoard.

Open the scene asset if it's not open already. You can do this by double-clicking it in the asset list. The Scene Editor will appear.
Select the Root node in the scene tree - it's the only one there currently. At the bottom of the Scene Editor, a panel of settings will appear for the node you selected. Tick the 'Is Patch' check box to mark this scene as adding some content on top of another scene.
More settings will appear:
- For the Target Scene, click the 🔗 link button, and in the dialog that pops up, select the
Scene_TownNSQscene - this is North Finmer's northern town square (hence 'NSQ'). - For the Injection Point, pick 'inside at the end (as Choices)' in the top dropdown, and pick 'ViewBoard' in the bottom dropdown. This tells Finmer to treat your scene as extra buttons to add onto the notice board's existing buttons - more on that later.
If the 'Scene_TownNSQ' scene asset does not show up in the asset selection dialog when you click the 🔗 link button, your dependency on Core is not loaded correctly. Don't forget you need to reload your project or restart the editor (either works) to make the dependency change take effect.

Writing the help notice
Now we can start adding new content into the main game!
With the Root node still selected, click Add Node. The first node we get is called a Choice node, since that is what we configured on the Root node earlier. Let's set up the new button to entice a player to pick up our quest. On the new Choice node, apply the following settings. You can leave the two check boxes unchecked.
Unique Key:     TQ01_Notice
Button Text:    Wanted: Strong Labor
Tooltip:        A 'help wanted' request of sorts...

This will add a new button at the bottom of the game screen, when the player visits the notice board. A Choice node represents a button the player can 'choose' - hence 'Choice' node.
The other main type of nodes are called States. States and Choices alternate each other: the player picks whichever Choice they like, and the game then picks a State in response. You can think of States as the game's 'reply' to the player's actions.
States always lead to Choices, and Choices always lead to States. The player picks Choices, the game picks States. Sometimes there is only one option, but this alternating pattern is always there. You can read more about this in the Scene document.
Next, add another node onto this Choice node (with the choice selected, click Add Node again), which results in a State node. This node will represent the game responding to the player picking up the notice, and transition us to the next set of choices. Let's give it a Unique Key of TQ01_Start. We will also need some script logic on the Actions Taken tab, but we'll get back to that later.
So, with our State node configured and select, click the Link button. Then, on the new Link node, set its Link Target Node to ReturnToBoard. (It should appear in the dropdown menu.) This will ensure that when the player reaches this state, we provide a button that takes them back to the main notice board - if we don't do this, the player has no choice buttons to take them out of the menu, and the game soft-locks.

Your mod in action!
Okay, let's see how this looks in-game!
Save your project, and click 🪲 Launch Dev Mode on the Toolbar. This will start up a copy of Finmer, and if everything goes correctly, your mod will be loaded too. Visit the notice board in North Finmer, and check out our new button in action!

Lookin' good! When we click our new button, nothing much happens - we get a prompt to continue. This is a start, but obviously we'll need more meat to our quest than this. For starters, we need the button to do something, like print a message on the screen.
Go back to our TQ01_Start node, and open the Actions Taken tab in the lower-right corner. Hover your cursor over the empty tab. A prompt will appear for you to create a script here. You can choose which type of script you want. Newcomers will probably want to choose Visual Scripts. These are lists of 'building block' commands that you put together, kind of like in tools such as RPG Maker. Alternatively, you may also choose to write Lua code directly if you prefer - this is the 'Raw Script' option.
This tutorial will provide both Visual scripts and Lua scripts. You can pick whichever one of the two you prefer. You can mix the two styles of scripts in the same scene, too, if you want - go with what you're comfortable with!
Click one of these two tabs, depending on which flavor of script you're using:
- Visual Script
- Lua Script
When you create a new Visual Script, you'll get this empty list:

Each line is a 'command' that the game will run. You can double-click on any of the [ Add ] lines to open a command palette. From the palette, you can pick whatever command you like, and where applicable you'll then get to customize the command.
Hover your cursor over the buttons on the command palette to see tooltips, showing more details about what the commands do.
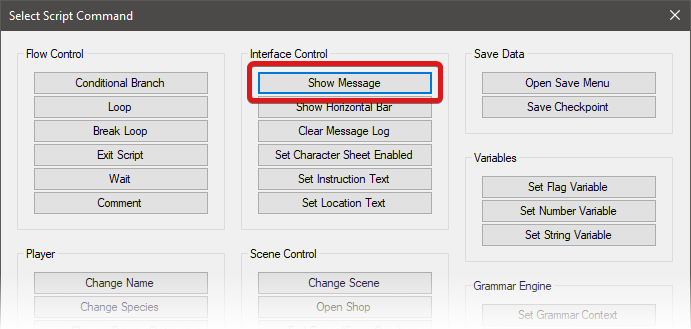
For this first node, we merely want to print some text to the screen. This is what the 'Show Message' command is for, under the 'Interface Control' group. Click this button. In the popup that appears, use TQ01_NOTICE as the String Table Key. (More on this later, just follow along.) Finally, click Accept.
Your script should look like this. If you need to edit a command, just double-click it to open the popup again to customize it.
Show Message: TQ01_NOTICE
We'll use the Log function to write some text to the game screen. TQ01_NOTICE will be our string table key. (More on this later, just follow along.) Remember, you can check the full API documentation in the Script Reference pages.
This should be your Actions Taken script:
Log("TQ01_NOTICE")

A spool of yarn
Next, we will write the actual text that will be shown to the player.
Create a new String Table asset and give it a name. For this tutorial, we'll go with TQ01_Strings. In our new String Table, click Add Set and call it TQ01_NOTICE - recall that this is the name we just used in our script. Then, in the big input field for that new string set, you can put whatever you feel like an ad for hired muscle would entail. Something like this:
TQ01_NOTICE:
A message is tacked haphazardly to the notice board: "To all able-bodied adventurers: if you are looking for a few quick coins, I have a deal for you. Meet me in the local inn for more details. -Tobias O. Natobi"\n\nHmm… Seems valid enough.
Note the \n snippets near the end of the string - all instances of \n (forward slash followed by lowercase 'n') will be converted by the game to a line break. So \n\n is a blank line.

With that string ready to go, let's go back to our scene. Take a look again at the TQ01_Start node. The Log command that we added earlier will grab the string that we just wrote (TQ01_NOTICE) and print it on the game screen. It will look up the 'key' in all loaded string tables, and find the nice text we just wrote. Now, if we save the module and play it, we'll see that message printed to the screen when we hit the button.

Next, let's get a journal going to keep track of everything that we do on this adventure of ours. Journals are meant to help remind players about what was going on in a story if they take a break or go off and do something else.
Create a new Journal asset. In the main game, journals are always named after the quest they represent, so for this tutorial, we'll call the asset TQ01. Set the Journal's summary to a nice title, something like "Hired Help", and add an entry with ID 0. The entry's ID is what you'll later use to tell Finmer which entry text you want to be shown. For the text, write something indicating that the player is interested in getting more information about the quest. For example:
A notice on the aptly-named notice board requested that you find a 'Tobias' in the inn. Find him and see what he wants.

Putting everything together
Now, we're going to want two things to happen. First, when the player views the notice, we'll want to add the entry to our journal. Second, we'll want to make sure we cannot start this quest again when we've already viewed the notice once. We'll need to make some changes to our previous nodes.
Open our TQ01_Patch_NoticeBoard scene again, and adjust the two nodes to perform these extra actions. We'll use a variable called TQ01_PROGRESS to keep track of which state our quest is in - it starts out as zero (all number variables are zero until you change them), and we'll increase it to mark the notice board section as 'done'.
The TQ01_Start node's updated Actions Taken script:
- Visual Script
- Lua Script
Show Message: TQ01_NOTICE
Set Number Variable 'TQ01_PROGRESS' to 1.00
Update Quest 'TQ01' to Stage 0
Log("TQ01_NOTICE")
Storage.SetNumber("TQ01_PROGRESS", 1)
Journal.Update("TQ01", 0)
Next, on the TQ01_Notice node, add this Appears When script, to prevent it from showing up again:
- Visual Script
- Lua Script
(If ALL of the following is TRUE:)
Number Variable 'TQ01_PROGRESS' Equals 0.00
return Storage.GetNumber("TQ01_PROGRESS") == 0
Congratulations! You now have a starting point for your new quest. This completes the first part of the tutorial. Next, we will provide exposition for the quest.