3 - The Campsite
Tobias mentioned the area to look for Theo would be west of town, so we'll add on to the directions at the crossroads south of Finmer. In the main game, this area is called Scene_RoadNorth, since it is the northmost part of the in-game road network.
Creating a new compass link
Create two new scene assets. Name one TQ01_Scene_Hideout, which will contain Theo's camp, and name the other TQ01_Patch_RoadNorth, which will hook up the camp scene to the main game.
Open TQ01_Patch_RoadNorth in the editor. This one is also a patch, that must be injected into Scene_RoadNorth. This time, we'll use a neat trick to add a new compass button into the main game. Set the Injection Point to "inside at the end (as Choices)" with the injection node set to Main.
In this patch scene, click the Root node in the node tree, and then click the Compass button. This will add a new Compass node, which is kind of like a Choice node except it adds a button to the compass on the left-hand side of the game screen, instead of a regular button at the bottom. Just like a regular Choice node, it can also have scripts on it, which we will use to ensure the player can only see this button after talking to Tobias in the inn.

Configure it like so:
Unique Key:         -
Compass Direction:  West
Target Scene:       TQ01_Scene_Hideout
Appears When:
    Visual Script:
    (If ALL of the following is TRUE:)
    Number Variable 'TQ01_PROGRESS' Equals 2.00

    Lua:
    return Storage.GetNumber("TQ01_PROGRESS") == 2
You can leave the Unique Key of any node empty, like we just did above. If you do, the game will auto-generate a key for you in the background. Keep in mind, however, that Link nodes and scene patches can only point to nodes that have a proper key set.

Since we only want to activate this patch and show the westbound link when the thief's hideout is known and active, we have an 'Appears When' script set up to check that the quest is in the right state. Remember, we previously configured the TQ01_Expo_End node in the TQ01_Patch_Inn patch to update the TQ01_PROGRESS variable as soon as the player accepts the quest, hence this script will activate from now on. The TQ01_Patch_RoadNorth patch is now done; all it needs to do is add a compass button.
Playing detective
Now, we'll build the TQ01_Scene_Hideout scene proper. This is not a patch, unlike the other scenes - it's a full, proper scene, so don't tick the 'Is Patch' box.
First off, we'd like to tell the player where they are. In Finmer, we usually use the text displayed above the in-game compass for that. Since the player is entering a new in-game area when they enter this scene, we should update this location label.
The 'Enter Script' is perfect for this. A scene's Enter Script will run, as the name suggests, whenever the player travels to that scene from somewhere else. Click the 'Enter Script' button on the toolbar to edit it, and set it up as follows:
- Visual Script
- Lua Script
Set Location to "Abandoned Campsite"
SetLocation("Abandoned Campsite")
With that ready, add the first state node from the Root, with the following settings:
Unique Key:         TQ01_Hideout
Actions Taken:      Show Message: TQ01_HIDEOUT
To go with it, add the following entry to our TQ01_Strings string table:
TQ01_HIDEOUT:
A fair trek from the main road, you encounter what looks like a makeshift encampment. A tattered bedroll and dilapidated firepit stand out most, as does a prone figure lying on the ground.
We see a prone figure on the ground, so let's make a choice node to approach them. Build the choice node as such:
Unique Key:         TQ01_Approach
Button Text:        Approach
Tooltip:            Approach the prone individual.
And on that node, add a new state node:
Unique Key:         TQ01_Approach2
Actions Taken:      Show Message: TQ01_APPROACH
Along with the accompanying string table entry:
TQ01_APPROACH:
You begin to walk over to the prone individual, calling to get their attention. They seem to ignore your shouts, and it's only until you get up to the body itself that you find out why. Cuts, gouges and lacerations cover the rat's body, and a pool of blood ebbs out from the corpse. Theo seems to have been attacked and killed.
Huh, Theo seems to be a goner. Well, that saves us some effort. We should see if he still has the pendant on him that Tobias wants back. Let's add a choice node to investigate his body:
Unique Key:         TQ01_Investigate
Button Text:        Investigate
Tooltip:            Investigate the body, see what happened.
For a little bit of character customization weight, we should make it so that the more attentive player characters are able to identify the cause for the wounds on Theo's body. We'll make two different state nodes as children from the TQ01_Investigate choice node:
Unique Key:         TQ01_InvestigatePass
Actions Taken:      Show Message: TQ01_INVESTIGATEWIT
Appears When:
    Visual Script:
    (If ALL of the following is TRUE:)
    Player Wits Stat >= 5.00

    Lua:
    return Player.Wits >= 5
Unique Key:         TQ01_InvestigateFail
Actions Taken:      Show Message: TQ01_INVESTIGATELOWWIT
As explained in the main documentation, the game checks states in order, from top to bottom. The first one to 'pass' is the one that will be selected. Hence, the node with the most specific requirements to trigger should be the first. If the low-wits state is the first child, it would always be chosen since it does not have an 'Appears When' script. Instead, if the high-wits state is first, it will be checked first. If its 'Appears When' script does not pass, then the game selects the low-wits state, providing us with the branching conversation we're looking for.
The string table entries for the above two nodes:
TQ01_INVESTIGATEWIT:
Looking a bit deeper into the wounds, you're able to see that they are bite and claw marks. The aggressor would have to be a medium-sized animal, possibly a local predator from the looks of it. Clearly, there were more than just one going after Theo. This poor rat was a victim of an animal attack, and didn't survive the onslaught.
TQ01_INVESTIGATELOWWIT:
These wounds appear all over Theo's body, with no rhyme or reason to where they were located. You cannot reliably determine what caused these injuries, but nevertheless they clearly proved to be his demise.
With our state nodes created, let's build off one of them and create a new choice node. Build it as follows:
Unique Key:         TQ01_Search
Button Text:        Search
Tooltip:            Search Theo's corpse for the pendant.
We just branched the conversation with our Wits check, but we now want the two paths to converge again. In whichever of the two state nodes you did not add TQ01_Search, you'll want to make a Link to point to TQ01_Search to get the scene to follow the same path again. Remember, you can right-click and drag TQ01_Search onto the other state node to quickly make a Link.
Before we can give the pendant to the player, we first need to tell Finmer what the pendant actually is, so let's get that set up in the editor. Add a new asset, this time an Item. Rename the asset to TQ01_I_Pendant and configure it as such. Feel free to also add an item icon if you have one lying around - any 32 by 32 pixels PNG image will be accepted.
Item Name:          Pendant
Type:               Generic
Value:              0
Quest Item:         ✔
Flavor Text:        A pendant for the Natobi family. There's probably a very complex backstory
                    behind this trinket, but who honestly wants to hear all of it?
Marking an item as Quest Item prevents it from being sold or discarded. You can also prevent the item from being sold by setting the purchase value to zero, though the player could still throw non-quest items away if they wish.
With the item ready, let's go back to the scene. The branch has reconverged, so add another state node off of TQ01_Search and build it accordingly:
Unique Key:         TQ01_Pendant_Get
Actions Taken:
- Visual Script
- Lua Script
Show Message: TQ01_NOTICE
Modify Player Money by 5
Add TQ01_I_Pendant to Inventory
Log("TQ01_SEARCH")
Player:ModifyMoney(5)
Player:GiveItem("TQ01_I_Pendant")
TQ01_SEARCH:
Well, nothing you can do to save the rat, so time to look for what you came to get. You pat down his pockets, trying to find where he kept the stolen pendant, if he still had it. You do find a couple coins hidden in his coat, and the pendant tucked into the folds of his pants. Seems it's still in good condition, nothing dented, scratched or broken. Tobias will want this back as soon as possible.
An ambush!
So we've granted the item to the player, as well as a bit of loose change that Theo had in his pockets. Now we can return to Tobias with the pendant in hand and collect our reward. However, this doesn't seem like a fulfilling quest. We should add something more to make the quest seem like a real task instead of a chore. Let's spruce things up by adding some combat. After TQ01_Pendant_Get, make a new choice node:
Unique Key:         TQ01_Fight_Cont
Button Text:        Continue
Tooltip:            Time to return to Tobias.
Followed by a state:
Unique Key:         TQ01_Fight
Actions Taken:      Show Message: TQ01_FIGHT_LEAD
TQ01_FIGHT_LEAD:
However, as soon as you get up, you hear a low growl from behind you. You spin around to find a lone wolf staring you down. Gray fur matted up, this wolf looks a bit rough, but why is it taking you on alone? Either way, it snarls menacingly and charges at you!
A-ha! A sudden, unprovoked fight! Now we're talking.
Finmer handles participants in fights using Creature assets. These store combat-related information like stats. So, for this fight, add a Creature asset and rename it to TQ01_CR_Wolf. For this tutorial, we're going with a wolf attacker, but feel free to use something else if you prefer. Configure it like so:
Creature Name:      Lone Wolf
Alias:              the wolf
Gender:             Ungendered
Level:              2
Size:               Medium
Strength:           4
Agility:            5
Body:               4
Wits:               1
Is Predator:        ✔
Digests Prey:       ✔
Next, make a choice node off of TQ01_Fight. This will contain our fight scene, and will have one of the longer scripts in this tutorial. Configure it like so:
Unique Key:         TQ01_Fight_Start
Button Text:        Uh-oh!
Tooltip:            And you thought this would be a simple job...
Actions Taken:
- Visual Script
- Lua Script
Start Combat with
    Participants:
    - Player
    - TQ01_CR_Wolf named 'wolf'
    Run Custom Scripts When:
    - Any Participant Vored
When Any Creature is Swallowed:
    Conditional Branch:
        (If ALL of the following is TRUE:)
        Participant 'wolf' Is Swallowed By 'player'
    Then:
        Set Flag TQ01_WOLF_NOM to True
    End If
local wolf = Creature("TQ01_CR_Wolf")
local fight = Combat2()
fight:AddParticipant(Player)
fight:AddParticipant(wolf)
fight:OnCreatureVored(function(predator, prey)
    if predator == Player then
        Storage.SetFlag("TQ01_WOLF_NOM", true)
    end
end)
fight:Begin()
Noticed how we put this fight script in the choice node instead of state nodes like everything else? This is because subsequent state nodes will branch based on how exactly the fight ended, such as the player devouring the enemy to win the fight (or not).
We have to add all participants into the battle individually, and then configure a callback for when a creature is devoured by another. If the player is the one doing the eating, we set a special flag. We can later check whether this flag was set in order to branch off in the scene.
Let's apply that idea now. Create two new state nodes in TQ01_Fight_Start:
- Visual Script
- Lua Script
Unique Key:         TQ01_Fight_Nom_Win
Actions Taken:
    Show Message: TQ01_FIGHT_FINISH_NOM
    Advance Time: 5 hours
    Wait: 2 seconds
    Show Message: TQ01_FIGHT_FINISH_NOM2
Appears When:
    (If ALL of the following is TRUE:)
    Flag 'TQ01_WOLF_NOM' Equals True
Unique Key:         TQ01_Fight_Win
Actions Taken:      Show Message: TQ01_FIGHT_FINISH
Unique Key: TQ01_Fight_Nom_Win
-- Actions Taken
    Log("TQ01_FIGHT_FINISH_NOM")
    AdvanceTime(5)
    Sleep(2)
    Log("TQ01_FIGHT_FINISH_NOM2")

-- Appears When
    return Storage.GetFlag("TQ01_WOLF_NOM")
Unique Key:         TQ01_Fight_Win
Actions Taken:      Show Message: TQ01_FIGHT_FINISH
Remember that the most specific node has to be at the top and the catch-all at the bottom. This way, the 'more specific' scenario - the player swallowing the assailant - will be checked first, and the regular path will act as a fallback.
For the relevant strings, add the following to TQ01_Strings:
TQ01_FIGHT_FINISH_NOM:
The wolf's gone quiet in your stomach for some time now. A couple pushes and prods into your {player.species}-gut does not evoke a response from the canine, though the glorps and burbles from your stomach are enough evidence you need to know the wolf is finished. Lethargy soon builds up within you, and you find a cozy spot to rest while sleep overtakes you.
TQ01_FIGHT_FINISH_NOM2:
When you reawaken, your gut has shrunk down significantly, to the point where nobody would be the wiser that you consumed an entire animal whole and kicking. You get back onto the path towards the town.
TQ01_FIGHT_FINISH:
Cleaning off your knuckles, you stare at the wolf's prone figure. Unmoving, it won't be coming back from that one anytime soon. Anyway, you begin your trek back to the town to return the pendant.
Now, we should finish up the scene. On one of the two state nodes, create a new choice node, and add a link to it in the other so that the two states reconverge:
- Visual Script
- Lua Script
Unique Key:         TQ01_To_Road
Button Text:        Continue
Actions Taken:
    Set Number Variable 'TQ01_PROGRESS' to 3.00
    Update Quest 'TQ01' to Stage 2
    Switch to Scene 'Scene_RoadNorth'
Unique Key:         TQ01_To_Road
Button Text:        Continue
-- Actions Taken
    Storage.SetNumber("TQ01_PROGRESS", 3)
    Journal.Update("TQ01", 2)
    SetScene("Scene_RoadNorth")
Ensure that your scene change command (or SetScene() Lua call) is the last one in the script. Changing scenes will terminate the script immediately, so any commands coming after it will not be evaluated.
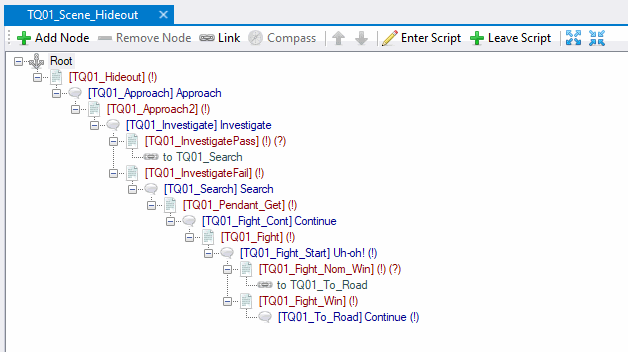
This kicks us back to the road, and updating the TQ01 variable will prevent the player from going back to the campsite again. Our scene is ready; it should now look like this:
To round off the last quest objective, let's add the last entry to our TQ01 journal asset. We've already hooked it up in the scene (see the scripts above), so all you need to do is add a new journal entry with ID 2. The entry should indicate that the item was retrieved:
After fighting off a wolf, you now have the Pendant that Tobias was looking for. You should return to him for the reward.
This will be the final entry in this quest journal. The whole thing should now look something like this:

We're almost there. The only thing left to do is hand in the quest item. In the next part, we'll head back to Tobias and wrap up this adventure.